Your expensive phone might be making movies look worse, not better, by defaulting to oversaturated, inaccurate colours.
- Most standard content (like news or web images) is made for the limited sRGB colour space, which looks unnaturally « sunburnt » on a modern wide-gamut DCI-P3 screen.
- Achieving true cinematic fidelity involves selecting the right streaming service tier and manually choosing display modes that honour the director’s original vision.
Recommendation: To fix this, switch your phone’s display setting from « Vivid » or « Auto » to « Natural » or « Cinema » mode for the most accurate colour reproduction across all content.
We’ve all been there. You unbox a brand-new flagship phone, mesmerised by its brilliant OLED display. You fire up a news channel or scroll through a website, and something feels… off. The news presenter’s face has a strange, radioactive tan, and logos that should be a familiar red now sear your retinas. This isn’t a defect; it’s a feature you haven’t tamed yet. Many people assume a high-end device automatically delivers the best picture, focusing on buzzwords like HDR, 4K, and Dolby Vision. While these are crucial components, they are only part of the story.
The real secret to a breathtaking mobile cinema experience doesn’t come from just having the latest tech. It comes from understanding it. The clash between different colour standards, primarily the older sRGB and the cinematic DCI-P3, is the single biggest culprit for inaccurate images on modern devices. If you’re a true movie buff—someone who cares about the director’s intended colour palette and the subtle details in a shadowy scene—then simply leaving your phone on its default « vivid » setting is a cinematic crime.
But what if the key wasn’t just buying a phone with the right logos, but learning to master its settings? This guide is for you. We’re going to dive deep into the world of mobile displays and audio, moving beyond the marketing hype. We’ll explore why that oversaturation happens, how to ensure you’re actually watching content in its intended cinematic format, and how to manage the real-world trade-offs, like battery life and screen glare, that come with this pursuit of perfection. This is about taking control and transforming your phone from a simple content viewer into a pocket-sized, reference-quality cinema.
This article unpacks everything a UK-based power user needs to know. From identifying true HDR content on your favourite streaming services to fine-tuning your audio for a complete sensory immersion, here is your roadmap to mobile cinematic fidelity.
Contents: sRGB vs. DCI-P3: A Guide to Cinematic Fidelity on Your Phone
- Why Do News Presenters Look Sunburnt on Your New Phone?
- How to Know if the Movie You Are Streaming Uses DCI-P3?
- The Battery Cost of Watching HDR Movies on the Train
- Cinema Mode or Auto: Which Respects the Director’s Vision?
- How to Reduce Glare to See the Full Colour Range?
- How to Set Your Screen Profile for Print-Ready Photography?
- How to EQ Your Phone Audio to Match Your Headphone Profile?
- How to Get True Hi-Res Audio on Your Smartphone in the UK?
Why Do News Presenters Look Sunburnt on Your New Phone?
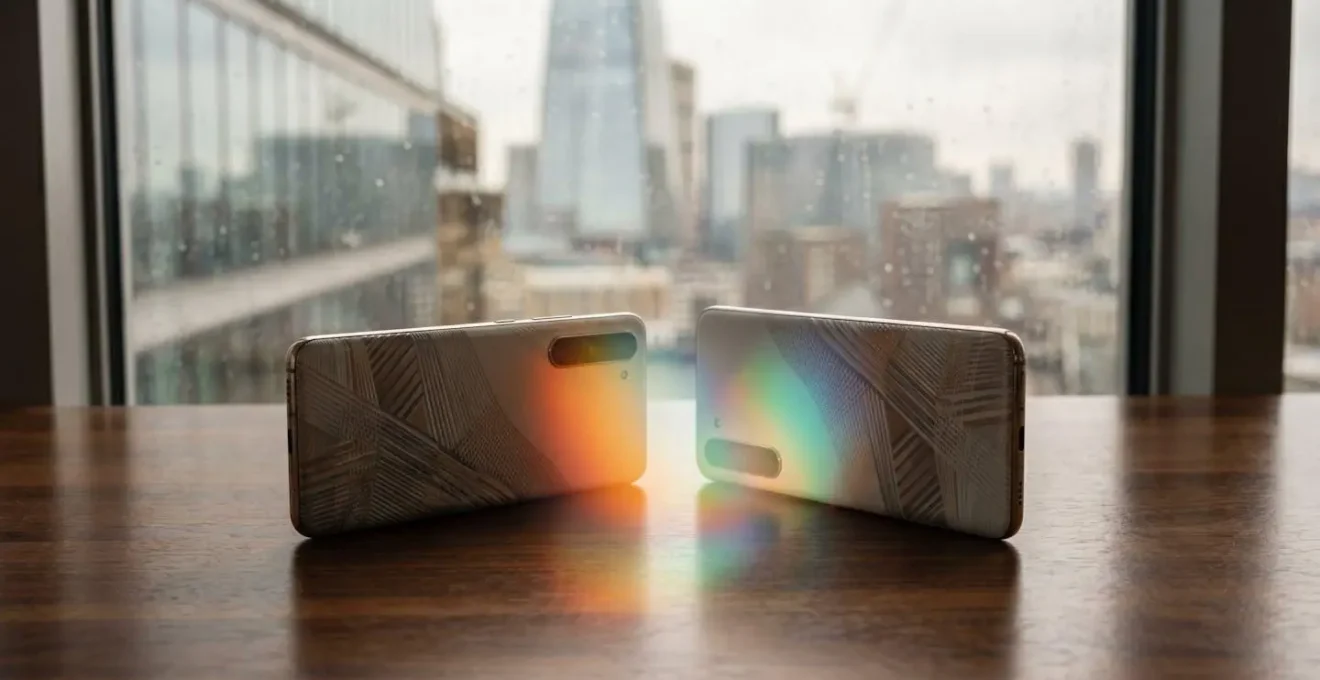
That unnaturally vibrant, almost cartoonish look of standard content on a new phone is a phenomenon I call the « Colour Trap. » It stems from a mismatch between the content’s original colour space and your display’s capabilities. For decades, the digital world was built around sRGB, a relatively limited colour gamut. Everything from websites and operating system interfaces to standard-definition TV news was mastered for sRGB. Your new phone, however, boasts a DCI-P3 display, a much wider, cinematic colour gamut designed for HDR movies. This is a huge upgrade, but it comes with a catch.
When your wide-gamut DCI-P3 screen tries to display sRGB content without proper colour management, it essentially « stretches » the colours to fill its larger container. Reds become fiery, greens become electric, and skin tones take on that bizarre, sunburnt hue. It doesn’t know the colours were meant to be more subtle. It’s like playing a gentle folk song through a heavy metal amplifier turned to eleven; the original intent is lost in a blast of overwhelming noise. The technical specifications confirm this, as Display P3’s gamut is approximately 50% larger in volume than sRGB.
This is not a sign of a better picture, but an inaccurate one. As experts in digital imaging often point out, this lack of management can completely distort the creator’s intent.
Any high-saturation mode on a wide-gamut cell phone that does not employ color management will cause sRGB web images to look oversaturated, at least compared to how they were meant to look.
– PetaPixel Technical Analysis, Color Gamut in Smartphones: What You Should Know
The solution is to tell your phone how to behave. By switching from a « Vivid » or « Saturated » profile to a « Natural » or « Cinema » mode, you engage the phone’s colour management system. This ensures sRGB content is displayed accurately within its intended boundaries, and the wider DCI-P3 gamut is reserved for content that can actually use it, like the movies we love.
How to Know if the Movie You Are Streaming Uses DCI-P3?
So, you’ve tamed your phone’s display by switching to a « Natural » profile, solving the « sunburnt presenter » problem. Now for the exciting part: unleashing the full power of DCI-P3 on content that’s actually designed for it. Premium streaming services are the primary source for this high dynamic range (HDR) content, often flagged with logos like Dolby Vision or HDR10+. These formats are mastered in the DCI-P3 colour space, carrying the extra information needed to produce those deep blacks, brilliant highlights, and rich, cinematic colours.
However, not all streams are created equal, and in the UK, access to this premium quality often depends on your subscription tier. Simply having the Netflix app isn’t enough; you need the ‘Premium’ plan to unlock 4K HDR. Similarly, Amazon Prime Video now reserves its highest quality formats for its ad-free subscribers. Legacy broadcasters like the BBC and ITV, while offering excellent content, are still largely limited to standard dynamic range (SDR) on mobile, which uses the sRGB gamut. For the true cinephile, services like Apple TV+ and Disney+ are fantastic, offering DCI-P3 content (via Dolby Vision or HDR10) as part of their standard premium packages.
The easiest way to check is to look for the Dolby Vision, HDR10, or HDR10+ logo on the movie or show’s information page within the app. Playing this content on a compatible high-end phone will automatically trigger the screen to switch into HDR mode, utilising its full DCI-P3 capabilities. This table breaks down the support across major UK streaming services.
This data, compiled from a recent analysis of UK streaming platforms, highlights where movie lovers should invest their subscription fees for the best possible mobile picture quality.
| Service | 4K HDR on Mobile | DCI-P3/Dolby Vision | UK Subscription Tier Required |
|---|---|---|---|
| Netflix | Yes | Dolby Vision HDR | Premium (£17.99/month) |
| Disney+ | Yes | Dolby Vision HDR, HDR10 | Premium (£10.99/month) |
| Apple TV+ | Yes | Dolby Vision HDR | Standard (£8.99/month) |
| Amazon Prime Video | Yes | HDR10+, Dolby Vision (ad-free tier only) | Prime membership + ad-free upgrade |
| BBC iPlayer | Limited | HD SDR only on mobile | Free (TV Licence required) |
| ITVX / Channel 4 / BritBox | Limited | HD SDR only on mobile | Free or £5.99/month (ITVX Premium) |
The Battery Cost of Watching HDR Movies on the Train
You’re settled in for your commute, headphones on, ready to dive into a blockbuster in glorious Dolby Vision HDR. You’re enjoying the stunning contrast and vibrant colours when you notice your battery percentage plummeting. This isn’t your imagination. Watching HDR content is one of the most power-intensive tasks you can ask of your phone. It’s a trade-off we must consciously manage, a concept I call the « Energy Budget. »
Why is it so demanding? HDR works by dramatically increasing the screen’s peak brightness for highlights—explosions, sunlit skies, reflections—while keeping blacks deep. To achieve this, the display’s LEDs are driven much harder than during normal SDR viewing. This requires a significant amount of power. A modern flagship phone might idle at 100-200 nits of brightness for web browsing but can spike to over 1000 nits for HDR highlights. This constant, dynamic power draw is what drains your battery so quickly.
The difference between devices can also be stark. Some manufacturers prioritise peak brightness and visual « pop » at the expense of efficiency, while others take a more balanced approach. Understanding your device’s behaviour is key to managing your energy budget on the go.
Case Study: The Flagship Battery Battle
In a detailed UK-based battery drain test comparing flagship phones, the trade-offs became clear. During a three-hour session of mixed usage that included HDR streaming, a hypothetical iPhone 17 Pro Max retained 73% of its charge, while a comparable Galaxy S25 Ultra dropped to 60%. The study noted that while the Samsung displays offered excellent HDR performance, this came at the direct cost of faster battery drain, particularly during the peak brightness moments demanded by HDR content. This highlights a difference in philosophy: one prioritises endurance, the other prioritises peak visual impact. As a power user, you need to decide which philosophy aligns with your needs for that specific journey.
Managing this means being strategic. If you have a long journey and a full movie to watch, you might consider downloading it beforehand to avoid the extra drain from a cellular modem. You might also avoid sitting in direct sunlight, which forces the screen to its absolute maximum brightness just to be visible, compounding the HDR power draw. It’s all about making conscious choices to spend your energy budget wisely.
Cinema Mode or Auto: Which Respects the Director’s Vision?
For years, home cinema enthusiasts have battled against the dreaded « soap opera effect »—an unnaturally smooth motion caused by TVs inserting extra frames into movies. This processing, while great for live sports, completely destroys the cinematic 24-frames-per-second cadence that filmmakers use. In response, the industry created Filmmaker Mode, a one-click setting on modern TVs that disables this and other unwanted processing to present the movie as the director intended.
As the technical team at a major review site explains, the goal is pure fidelity. This principle is at the heart of our quest for a true cinema experience.
Filmmaker Mode sets the frame rate, aspect ratio, color and contrast of a TV show or movie via the metadata of the film so that your TV can display it the way it was intended to be viewed in the cinema.
– Tom’s Guide Technical Team, What is Filmmaker Mode? Here’s why you should use this picture-perfect setting
While an officially branded « Filmmaker Mode » doesn’t exist on smartphones yet, the philosophy behind it is fully implemented in presets often called « Cinema, » « Movie, » or « Natural. » Selecting this mode is the single most important step you can take to respect the director’s vision. It typically performs several crucial functions: it disables aggressive motion smoothing, locks the white point to the industry standard D65 (6500K) to prevent colours from appearing too cool or warm, and turns off any artificial sharpening or « colour enhancement » that would distort the original image.
Leaving your phone on « Auto » or « Vivid » is essentially telling the device’s engineers that you prefer their interpretation of what looks good over the film’s actual director and colourist. For a cinephile, the choice is clear. Always choose the mode that promises fidelity and accuracy over artificial « pop. » This, combined with playing true HDR content, is how you get as close as possible to a reference-quality image in the palm of your hand.
How to Reduce Glare to See the Full Colour Range?
You can have the most perfectly calibrated DCI-P3 display and a pristine Dolby Vision stream, but if you’re watching on a train with the bright UK sky reflecting off your screen, you’re not seeing the director’s vision. You’re seeing a muddy, washed-out mess. Environmental Calibration—controlling your viewing environment—is the final, and often most overlooked, piece of the mobile cinema puzzle. The primary enemy here is glare.
Glare does two destructive things. First, it crushes black levels. The subtle, shadowy details the cinematographer painstakingly captured are obliterated by the reflection of the overhead lights or the window. You lose all sense of depth and contrast. Second, it forces you to crank up the screen brightness to maximum just to see the image, which, as we’ve discussed, decimates your battery and can even cause the phone to overheat and dim itself automatically—a frustrating cycle.
To truly appreciate the full colour range and dynamic contrast of an HDR film, you need to minimise these reflections. This doesn’t mean you have to sit in a pitch-black room, but it does require some strategic thinking, especially when on the move. Simple actions like choosing a seat away from the window, angling the screen away from overhead lights, or even using your jacket to create a small « hood » around the screen can make a world of difference. For those who frequently watch in bright conditions, investing in a specific type of screen protector can also be a game-changer.
Your Action Plan: The UK Power User’s Anti-Glare Strategy
- Avoid viewing HDR content in direct sunlight: Outdoor sunlight forces the screen to max out brightness (often exceeding 1500 nits on flagship devices), drastically increasing power draw and triggering thermal throttling that dims the display.
- Use auto-brightness strategically: Instead of manually setting maximum brightness, enable auto-brightness which adapts to ambient conditions more efficiently, reducing battery consumption by up to 20% during commutes with fluctuating tunnel lighting on UK train lines.
- Invest in anti-reflective screen protectors from UK retailers: Matte screen protectors available from Amazon.co.uk or Currys reduce glare significantly in diffuse British daylight, though they may slightly reduce sharpness. The trade-off allows viewing at 60-70% brightness instead of 100%, saving battery and preventing thermal dimming.
- Download content via Wi-Fi before travel: Streaming HDR over cellular connections in UK ‘not-spots’ between cities forces the modem to constantly search for signal, adding 15-25% additional battery drain. Downloading via home Wi-Fi eliminates this ‘battery tax’ entirely.
By actively managing your environment, you allow yourself to watch content at a more reasonable, battery-friendly brightness level while seeing more of the image’s intended detail. It’s the final step in taking full control of your viewing experience.
How to Set Your Screen Profile for Print-Ready Photography?
While our focus is cinematic video, the principles of colour accuracy and creator’s intent apply equally to still photography—another area where your phone’s DCI-P3 display shines. For a professional or enthusiast photographer, a colour-managed workflow is non-negotiable. The goal is « soft proofing »: ensuring the image on your screen is a faithful representation of how it will look when printed.
This is where the distinction between DCI-P3 and Apple’s « Display P3 » becomes important. They are not quite the same. As a detailed technical analysis from PetaPixel explains, Apple targets its own wide-gamut Display P3 colour space. It uses the same vibrant colour primaries as the cinematic DCI-P3 standard, but crucially, it adopts the D65 white point and gamma curve of the sRGB standard. This hybrid approach makes it an excellent all-rounder, providing cinematic colour richness while maintaining compatibility with the broader digital world.
For a photographer editing on a high-end phone, the process mirrors our cinema workflow. First, you must set the screen to its « Natural » profile to ensure you’re seeing the image’s true colours, not an artificially enhanced version. Second, you use editing apps that are colour-aware, like Adobe Lightroom Mobile. These apps can be configured to simulate the target print profile (e.g., the profile for a specific photo lab’s paper and ink), allowing you to make adjustments on your screen with confidence that the final print will match.
Just as we seek to honour the filmmaker’s vision, the photographer aims to control the final output, ensuring the mood and tone captured in the field are accurately translated to the printed page. Your phone’s display, when correctly managed, is a powerful tool in achieving this, acting as a reliable window into the final creative product.
How to EQ Your Phone Audio to Match Your Headphone Profile?
A true cinematic experience is as much about what you hear as what you see. We’ve gone to great lengths to ensure colour fidelity; we must apply the same rigour to audio. Every pair of headphones has its own unique sound signature—some are bass-heavy, some have pronounced treble, others are more neutral. Simply plugging them in and pressing play means you’re hearing a combination of the movie’s audio mix and your headphone’s inherent biases. To achieve audio fidelity, we need to correct for this using an equalizer (EQ).
The goal of EQing for movies isn’t to create a « fun » sound, but an accurate one. You want to hear the dialogue clearly, feel the rumble of an explosion without it overpowering everything else, and appreciate the subtle atmospheric sounds that build a scene’s tension. The first step is to start from a neutral or « flat » EQ profile. From there, you can make small, precise adjustments. A good rule of thumb is to cut frequencies rather than boost them, as boosting can introduce distortion.
For a movie buff, three key frequency ranges matter:
- Lows (60-250 Hz): This is where you’ll find the visceral rumble of explosions and the weight of the score. If your headphones are too bassy, a slight cut here can prevent dialogue from sounding muddy.
- Mids (500 Hz – 2 kHz): This is the heart of dialogue clarity. If you’re struggling to hear what characters are saying, a very gentle boost in this range can help, but be careful not to make it sound nasal or « honky. »
- Highs (4-8 kHz): This range adds crispness and detail to sound effects like rustling leaves or shattering glass. If your headphones sound « dull, » a small lift here can add sparkle. If they sound harsh or sibilant, a cut is needed.
Many high-end headphone manufacturers (like Sony, Bose, and Sennheiser) provide their own apps with custom EQs designed for their products. For a truly reference-level experience, apps like SoundID by Sonarworks can create a custom profile based on your specific headphone model and even your personal hearing, delivering an astonishingly flat and accurate response. This is the audio equivalent of switching to « Cinema Mode »—removing the hardware’s bias to get closer to the sound mixer’s original intent.
Key Takeaways
- The biggest enemy of colour accuracy is a wide-gamut (DCI-P3) display showing unmanaged sRGB content, causing oversaturation.
- Always use « Natural » or « Cinema » display modes to enable colour management and ensure fidelity to the creator’s intent for both movies and photos.
- Watching true HDR content is a trade-off, providing stunning visuals at the cost of significant battery drain, which must be managed strategically.
How to Get True Hi-Res Audio on Your Smartphone in the UK?
We’ve calibrated our screen for perfect colour and EQ’d our audio for a balanced sound. The final piece of the puzzle is ensuring the source material itself—both video and audio—is of the highest possible quality. For audio, this means moving beyond standard compressed formats and embracing Hi-Res Lossless Audio. Just as DCI-P3 contains more colour information than sRGB, Hi-Res Audio contains more sonic information than a standard MP3 or streaming file, delivering detail, dynamism, and clarity that’s closer to the original studio recording.
In the UK, several streaming services offer this, but the ecosystem can be tricky. To experience true Hi-Res Audio, you need a chain of compatible components. First, the service itself must offer a lossless tier (like Apple Music, Amazon Music HD, or Tidal). Second, you generally need a wired connection to your headphones. Standard Bluetooth codecs compress the audio, throwing away the very « Hi-Res » data you’re paying for, though newer codecs like LDAC and aptX HD get much closer.
For the ultimate mobile fidelity, an external Digital-to-Analog Converter (DAC) is recommended. The DAC built into your phone (or its dongle) is designed for convenience, not audiophile performance. A dedicated portable DAC/amp (from brands like Chord, iFi, or FiiO) takes the raw digital signal from your phone and performs a much higher-quality conversion to the analog signal your wired headphones use. This is the definitive way to ensure you’re hearing every last bit of detail the sound mixer intended.
For the UK movie buff who values an integrated ecosystem, Apple presents a compelling case. As a UK pricing analysis reveals that Apple TV+ costs £8.99/month, it’s competitively positioned against video rivals. Crucially, this ecosystem includes Apple Music, which provides a massive library of Hi-Res Lossless audio at no extra charge. This allows a user to access both top-tier Dolby Vision video and bit-perfect audio, creating a powerful and cost-effective solution for a complete high-fidelity mobile experience.
By understanding and mastering these principles—from colour management and display modes to battery budgets and audio chains—you can finally unlock the true potential of your device. It’s time to stop letting your phone dictate your experience and start curating a reference-quality cinematic presentation, wherever you are.
Frequently Asked Questions on Mobile Cinema Fidelity
Why isn’t Filmmaker Mode available on smartphones like it is on TVs?
Filmmaker Mode was developed by the UHD Alliance specifically for TV displays in 2019. Mobile manufacturers (Apple, Samsung) implement similar principles through their ‘Cinema’ or ‘Movie’ modes, but these aren’t standardized across the industry. Smartphones lack the automatic metadata-triggered activation that TVs support, requiring manual preset selection instead.
How can UK users manually replicate Filmmaker Mode settings on their phone?
To approximate Filmmaker Mode on mobile: disable motion smoothing or frame interpolation, set white point to D65 (6500K), disable all color enhancement features, set display to ‘Natural’ or ‘Cinema’ preset, and ensure HDR content is played in apps that support proper HDR10 or Dolby Vision metadata (Netflix, Disney+, Apple TV+).
Does enabling Dolby Atmos audio complete the ‘Director’s Vision’ on mobile?
Yes, enabling Dolby Atmos in device settings when content supports it ensures you receive the spatial audio mix as intended by the filmmakers. On iPhone, go to Settings > Music > Dolby Atmos and set to ‘Always On’ for compatible content. On Samsung devices, enable Dolby Atmos in Settings > Sounds and Vibration > Sound Quality and Effects.