
True productivity on a UK train isn’t about having the best laptop; it’s about mastering the journey’s physical and digital constraints.
- Unreliable connectivity is a feature, not a bug. An offline-first workflow is non-negotiable.
- Your biggest ergonomic enemy isn’t the seat, it’s the table height. A portable stand is essential.
Recommendation: Prioritise a device with a small physical footprint (like a MacBook Air or 11-inch iPad) and invest in a physical laptop lock. These two choices solve 80% of the problems you’ll face.
For any commuter or digital nomad, the train journey between Manchester and London or up to Edinburgh should be a golden opportunity for productivity. It’s a few uninterrupted hours, a moving sanctuary away from office chatter and domestic distractions. Yet, the reality is often a frustrating battle against patchy 5G, a creeping neck ache, and the constant, low-level anxiety of leaving a £1500 laptop unattended while you grab a coffee. We’re often told to just get a good power bank and noise-cancelling headphones, but these are table stakes.
The common advice misses the core of the problem. It assumes the environment is a stable, predictable office, just smaller. This is fundamentally wrong. The UK rail network, particularly lines like the West Coast Main Line, is a uniquely challenging workspace defined by specific, predictable failures in connectivity and ergonomics. The key to a stress-free mobile office isn’t just about packing the right gear; it’s about adopting a strategy specifically designed for the constraints of this moving metal tube. This isn’t about working *harder*; it’s about working *smarter* by anticipating the journey’s friction points.
This guide moves beyond the generic tips. We will dissect the real-world problems of a UK train commute and provide practical, experience-tested solutions. We’ll cover everything from why your 5G dies in the Chilterns, to the specific ergonomics of an Avanti train table, and how to navigate the London Underground when all signal is lost.
In this article, we will explore the essential strategies and tools to transform your train journey into a truly productive and stress-free extension of your office. The following sections will guide you through each critical aspect of mastering the mobile workspace.
Summary: A Practical Guide to Mastering Your UK Train Commute
- Why Your 5G Fails on the West Coast Main Line and What to Do?
- How to Secure Your Tech in a Coffee Shop Without Packing Up Every Time?
- iPad Pro or MacBook Air: Which Fits Better on an Economy Train Table?
- The Neck Pain Mistake 80% of Commuters Make While Working
- How to Stretch Your Laptop Battery for the Full 4-Hour Journey to Edinburgh?
- How to Navigate the Underground Without Signal?
- Passive Isolation or Active Cancellation: Which Is Safer for Walking in London?
- Google Maps vs Citymapper: Which Is Best for London Commuting?
Why Your 5G Fails on the West Coast Main Line and What to Do?
It’s the modern commuter’s paradox. Your provider boasts that over 90% of the UK population is covered by 5G, yet the moment your train leaves Manchester Piccadilly and hits the countryside, your connection evaporates. The problem isn’t your phone; it’s physics and geography. The West Coast Main Line is notorious for its deep cuttings and tunnels, physical barriers that block mobile signals. A train moving at 125 mph is also constantly switching between cell towers, a process called “handover,” which is often too slow to maintain a stable data stream. This combination creates a perfect storm for connectivity blackouts.
Relying on the train’s on-board Wi-Fi is often a fool’s errand. The system shares a single, often weak, satellite or cellular link among hundreds of users. The solution is to stop fighting the problem and start working around it. This means adopting an offline-first workflow. Before you leave, download everything you need: documents, articles, emails for offline viewing, and even large datasets. Treat the journey as a dedicated “deep work” session where you are free from the distraction of incoming notifications. Any moments of stable signal can then be used strategically for quick syncs or sending pre-written emails, rather than trying to sustain a video call.
Fortunately, long-term improvements are on the horizon. Network Rail’s “Project Reach” is a major initiative to tackle these blackspots by laying over 1,000km of fibre optic cable along major routes and installing new mobile infrastructure in tunnels. However, with the first installations not expected until 2026, a proactive, offline strategy remains the best approach for the foreseeable future.
How to Secure Your Tech in a Coffee Shop Without Packing Up Every Time?
You’ve arrived at Euston, and you have an hour to kill before your next meeting. You find a spot in a nearby coffee shop, but the moment you need to order or use the restroom, the dilemma hits: do you pack up your entire setup? It’s a significant risk not to. Research highlights the shocking prevalence of laptop theft, with a laptop being stolen every 53 seconds. The same data reveals that over half of business managers admit to sometimes leaving their laptops with a stranger while travelling.
This isn’t just about losing hardware; it’s about data security. A study by the Ponemon Institute identified public spaces like coffee shops as a major threat vector for data loss from unsecured devices. The “grab-and-go” theft is the most common method. The solution is not to ask a stranger to “watch your stuff,” but to employ a simple, physical deterrent: a Kensington-style cable lock. This small, lightweight device is the single best investment for a mobile worker. It allows you to physically tether your laptop to a table leg or other sturdy fixture in seconds, providing a powerful visual and physical deterrent against opportunistic thieves.

This simple tool transforms your security posture. It means you can confidently step away for a couple of minutes without the tedious and time-consuming process of packing and unpacking your entire mobile office. For less than the cost of a few train station coffees, it buys you invaluable peace of mind and operational flexibility. Paired with software security like “Find My” services and strong passwords, it creates a robust, multi-layered defence for the urban nomad.
iPad Pro or MacBook Air: Which Fits Better on an Economy Train Table?
The tiny, often wobbly, fold-down table in an economy class carriage is the ultimate test of a mobile office setup. Here, device choice is dictated not by raw power, but by physical footprint. The two main contenders are the MacBook Air and the iPad Pro with a Magic Keyboard. While both are excellent devices, their suitability for a cramped train table is markedly different. The key metrics are not just weight, but the depth and rigidity of the device’s base.
The MacBook Air has a single, solid base. It’s stable, but its footprint is fixed. The 13-inch model requires a depth of 8.46 inches. The iPad Pro with a Magic Keyboard, while having a similar total weight, offers a significant advantage: the keyboard part of the base is much shallower. This allows the screen to “float” over the back edge of the table, drastically reducing the required surface area. The 11-inch iPad Pro setup is the champion of compact spaces. However, this flexibility comes at a cost. An iPad Pro with a Magic Keyboard is significantly more expensive than a comparably powerful MacBook Air.
This table, based on an in-depth comparative analysis, breaks down the critical dimensions.
| Device | Footprint (inches) | Thickness (inches) | Weight (lbs) | With Keyboard Weight (lbs) |
|---|---|---|---|---|
| MacBook Air (13-inch) | 11.97 x 8.46 | 0.44 (uniform) | 2.7 | 2.7 (built-in) |
| iPad Pro (12.9-inch) | 11.04 x 8.46 | 0.25 | 1.5 | 3.0 (with Magic Keyboard) |
| iPad Pro (11-inch) | 9.74 x 7.02 | 0.23 | 1.0 | 2.3 (with Magic Keyboard) |
Ultimately, the choice depends on your priorities. If maximum space efficiency on a tiny table is your primary concern, the 11-inch iPad Pro is unbeatable. If you need a more traditional laptop experience and cost is a factor, the MacBook Air is the more pragmatic choice, but be prepared for it to occupy every last millimetre of your table space.
The Neck Pain Mistake 80% of Commuters Make While Working
After an hour of focused work on the train, you feel it: a dull ache at the base of your neck, spreading up into your shoulders. This is “tech neck,” and it’s the result of one critical ergonomic flaw common to almost all mobile work setups. You’re looking down at your laptop screen. This posture forces the head forward, placing immense strain on the cervical spine. Considering that neck pain prevalence among office workers ranges from 42-63%, the added strain of a poor train setup is a significant health risk.
The mistake is assuming you have to use the laptop as an all-in-one unit. The solution is to decouple the screen from the keyboard. By using a small, foldable laptop stand, you can elevate your screen to eye level. This immediately corrects your posture, aligning your head with your spine and relieving the strain. Of course, this makes the built-in keyboard and trackpad unusable. That’s why the second part of the solution is an ultra-slim, separate wireless keyboard and a compact mouse that you place at the edge of the table. This setup mimics a proper desktop ergonomic arrangement, even in a cramped space.
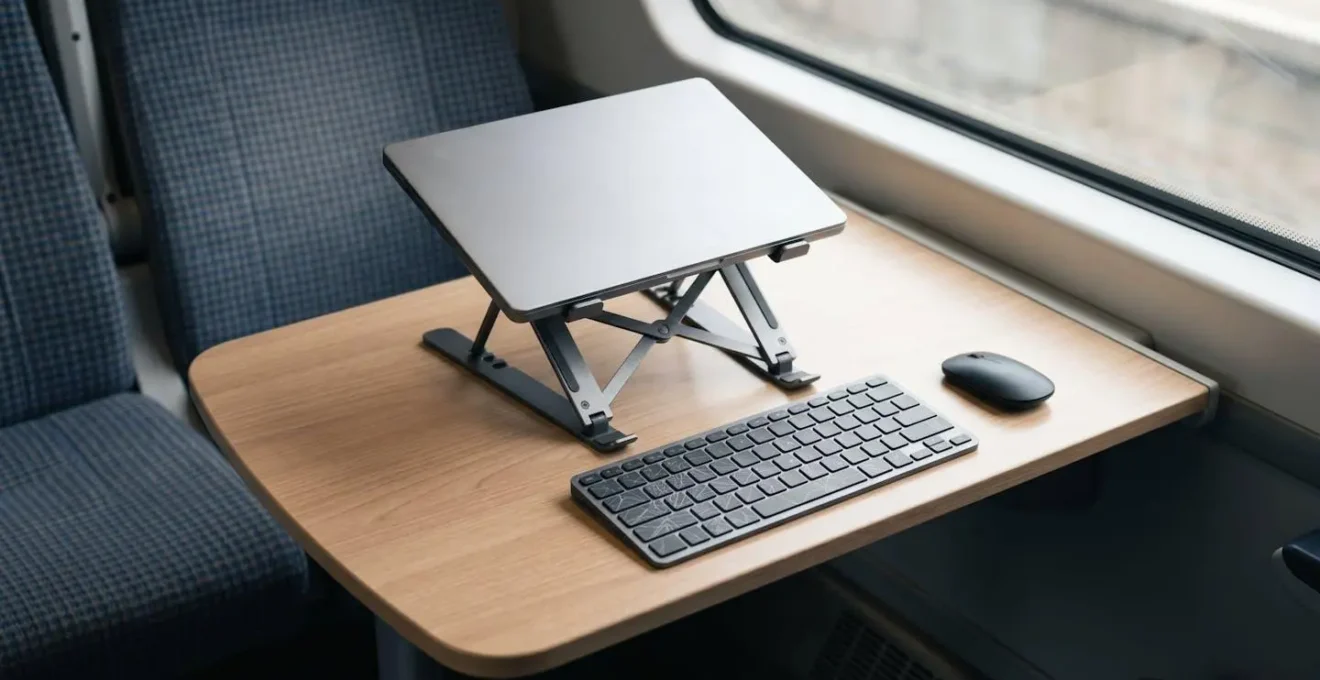
This two-piece solution—a stand and a keyboard—is the single most effective way to combat journey-induced pain and fatigue. It’s a small addition to your travel kit that pays huge dividends in comfort and long-term health. To further combat stiffness, performing simple stretches in your seat can make a world of difference.
Your In-Seat Ergonomic Reset Checklist
- Neck rolls: Slowly rotate your head in a circular motion, 5 times clockwise and 5 times counterclockwise.
- Wrist flexes: Extend arms forward, gently pull fingers back with opposite hand, hold 10 seconds, repeat 3 times each side.
- Shoulder shrugs: Lift shoulders to ears, hold for 3 seconds, then release. Repeat 10 times.
- Scapula squeezes: Without moving your arms, pull your shoulder blades together as if holding a pencil between them. Hold for 5 seconds, release. Repeat 8 times.
- Seated spinal twist: Sit upright, place your right hand on your left knee, and gently twist your torso to the left. Hold for 15 seconds, then switch sides.
How to Stretch Your Laptop Battery for the Full 4-Hour Journey to Edinburgh?
The journey from Manchester to Edinburgh is a solid four hours—often longer than your laptop’s “real-world” battery life. While many trains have power sockets, they can be unreliable or already taken. Mastering battery conservation is therefore not an option, but a necessity. The biggest drains on your battery are the screen brightness and background processes you’re not even aware are running. A power bank is a good backup, but true efficiency comes from optimising your machine’s consumption.
The first and easiest win is to reduce screen brightness to a comfortable but not excessive level (around 50-60% is usually sufficient in a train carriage). The second, more impactful step is to become a ruthless manager of your background processes. Cloud syncing services like Dropbox, Google Drive, and Adobe Creative Cloud are notorious energy hogs, constantly checking for updates. Similarly, having dozens of browser tabs open, especially in a browser like Chrome, consumes significant CPU cycles and, therefore, battery. According to independent testing, the MacBook Air is rated for 15 hours of wireless web surfing compared to the iPad Pro’s 10 hours, largely due to its more efficient operating system and hardware integration.
Before any long journey without guaranteed power, you should perform a “pre-flight check” to kill unnecessary processes. This can easily double your effective work time.
Action Plan: Maximising Battery Life
- Energy Audit: Open Activity Monitor (Mac) or Task Manager (Windows) and sort the process list by “Energy Impact” or “Power Usage” to see what’s draining your battery.
- Cull Background Apps: Identify and quit any non-essential, energy-hungry processes. This often includes cloud sync clients (Dropbox, OneDrive) and helper processes from apps like Chrome or Adobe.
- Disable Auto-Updates: Go into your system settings and temporarily disable automatic app updates and background app refresh.
- Dim the Display: Manually reduce your screen brightness to 50-60% and ensure any “auto-brightness” features are enabled.
- Browser Discipline: Close all unused browser tabs. For maximum efficiency, use Safari on a Mac or Microsoft Edge on Windows, as they are optimised for their respective operating systems and are far more power-efficient than Google Chrome.
How to Navigate the Underground Without Signal?
You’ve successfully worked all the way to Euston. You step off the train and head for the Underground, only to realize your next challenge: zero mobile signal. Trying to look up your final destination, the correct line, or the best exit at your destination station is impossible once you’re past the ticket barriers. For the unprepared, this can be a moment of panic. For the seasoned traveller, it’s a non-issue because the work was done beforehand.
The solution is simple: plan your final leg before you lose your signal. While you are still on the mainline train with some form of connectivity, or on the concourse at Euston, you must look up your complete journey. This doesn’t just mean knowing which line to take (e.g., the Northern Line). It means knowing: – The exact station you are going to. – The best exit to take at that station for your final destination. – Any changes you need to make (e.g., from the Northern Line to the Central Line at Tottenham Court Road).
Modern mapping apps are built for this. Both Google Maps and Citymapper allow you to download maps of London for offline use. By doing this, you have the entire tube map and station layouts available on your phone, even with no signal. Citymapper, in particular, excels here by telling you which part of the train to board (front, middle, or back) to be closest to the exit or your interchange, saving you valuable minutes and stress. A quick screenshot of your final route and a glance at an offline map is all you need to navigate the Tube like a local.
Passive Isolation or Active Cancellation: Which Is Safer for Walking in London?
Stepping out of the station into the organised chaos of London, your headphones are your personal sanctuary. But the choice of headphone technology can have serious safety implications. The debate centres on how you manage ambient noise: do you block it, cancel it, or let it in? The two most popular technologies, Active Noise Cancellation (ANC) and Passive Isolation, present different risks and benefits for an urban pedestrian.
Active Noise Cancellation (ANC) uses microphones to detect and electronically cancel out low-frequency background noise, like the drone of an engine or the rumble of a train. While excellent for focus, this is extremely dangerous for walking in a busy city, as it can completely mask the sound of approaching vehicles, sirens, or cyclists. Passive Isolation is simply the physical blocking of sound by the earbud or headphone cup itself. It’s less effective than ANC but allows more high-frequency sounds (like a shout or a horn) to get through.
However, the safest options are technologies designed specifically for situational awareness. Transparency Mode (or Ambient Mode), found on most modern ANC headphones, uses external microphones to feed crucial outside sounds back into your ears. This gives you the best of both worlds: you can listen to your audio while still hearing a car horn. The absolute gold standard for safety, though, is Bone Conduction. These headphones sit in front of your ears, leaving your ear canals completely open to the environment. You hear everything around you perfectly, while the audio is transmitted via vibrations through your cheekbones.
The following table compares the different technologies for the specific use case of urban walking.
| Technology | Awareness Level | Safety for Urban Walking | Audio Quality | Example Models |
|---|---|---|---|---|
| Active Noise Cancellation (ANC) | Low – blocks ambient sound | Not recommended | Excellent | AirPods Pro, Sony XM5, Bose QC |
| Transparency Mode | High – amplifies critical sounds | Good with correct config | Excellent | AirPods Pro, Sony XM5, Bose QC |
| Bone Conduction | Maximum – ear canals open | Best for safety | Good (not audiophile) | Shokz OpenRun, AfterShokz |
| Passive Isolation | Medium – physical blocking | Moderate risk | Very Good | Traditional earbuds |
Key Takeaways
- Your mobile office’s success depends on adapting to constraints, not just owning good tech.
- Prioritise an offline-first workflow; reliable train connectivity is a myth.
- The best ergonomic investment is a portable laptop stand and an external keyboard to save your neck.
Google Maps vs Citymapper: Which Is Best for London Commuting?
For navigating London’s complex public transport network, your choice of app can make the difference between a seamless journey and a frustrating delay. While Google Maps is a competent all-rounder, for anyone frequently travelling in London, Citymapper is unequivocally the superior tool. It is designed from the ground up with the multi-modal urban commuter in mind, offering a depth of features that Google Maps simply can’t match in this specific context.
Google Maps is great for getting from a single point A to B. It will show you tube lines and bus routes. Citymapper, however, thinks about the entire journey as a system. Its real-time disruption handling is far more sophisticated, not just showing you a line is delayed but instantly re-routing you via a combination of tube, bus, and even walking to find the fastest new path. Its most iconic feature is perhaps the “Suggested Exit” advice, which tells you which carriage to board to be perfectly positioned for your exit or interchange, a small detail that saves immense time and hassle during peak hours.
Furthermore, Citymapper integrates features that are critically important for a resident or frequent visitor, such as journey cost estimation that accounts for daily and weekly Oyster/contactless capping, and accessibility options like “rain-safe” routes. The comparison below, based on features available on the official Citymapper London page, makes the choice clear for a serious commuter.
| Feature | Google Maps | Citymapper |
|---|---|---|
| Real-time disruption handling | Good – shows delays | Excellent – instant alternative routes |
| Journey cost estimation | Not available | Yes – includes Oyster/contactless caps |
| Multi-modal integration | Basic | Advanced – bike, tube, bus, rail combined |
| Accessibility features | Limited | Rain-safe routes, wheelchair accessible options |
| Carriage position advice | Not available | Yes – ‘Suggested Exit’ feature |
| Calendar integration | Yes | Yes – with automatic journey alerts |
| Live progress sharing | Yes | Yes – optimized for colleagues |
While Google Maps is sufficient for a tourist, for anyone relying on the transport system to get to meetings on time, Citymapper is the essential, non-negotiable tool for the job.
By mastering these specific challenges of connectivity, security, ergonomics, and navigation, you can transform the dead time of a train journey into one of your most focused and productive work environments. Evaluate your current setup and implement these targeted strategies on your next trip.