The debate isn’t about choosing RAW or AI—it’s about knowing when to use each to get professional results without spending hours editing.
- Let your phone’s AI handle well-lit, simple scenes for quick, shareable photos.
- Switch to RAW (or ProRAW) only when facing challenging situations like high-contrast landscapes, low-light portraits, or creative night shots.
Recommendation: Think of AI as your fast, everyday assistant and RAW as your specialist tool for the shots that truly matter. Mastering this balance is the key to better holiday photography.
You’ve been there: a breathtaking sunset paints the sky, but the photo on your phone looks flat, with a weirdly glowing blue sky and crushed, dark shadows. Or that perfect candid portrait you took now has skin that looks unnervingly smooth, like plastic. This is the common frustration for many casual photographers. You have a powerful camera in your pocket, yet the results often feel like a letdown, a pale imitation of the moment you tried to capture.
The standard advice is often a confusing binary. One camp tells you to “always shoot in RAW” for maximum quality, plunging you into a world of complex editing sliders and massive files. The other camp suggests you just trust your phone’s automatic “AI” processing, accepting its sometimes-questionable creative decisions. This leaves you feeling stuck between becoming a semi-professional photo editor and giving up on creative control entirely.
But what if the real secret wasn’t choosing a side, but developing a smarter strategy? What if the key to unlocking stunning holiday photos without the editing marathon was knowing precisely *when* to let the AI work its magic and *when* to step in and take control with RAW? This isn’t about a format war; it’s about a workflow revolution. It’s about understanding the “why” behind your phone’s processing so you can use it to your advantage.
This guide will walk you through that exact framework. We’ll demystify why your phone makes the choices it does, show you how to identify the specific situations where RAW is your secret weapon, and give you the confidence to take back control for the photos that truly matter, leaving the rest to your capable AI assistant.
To navigate this complex but rewarding topic, this article will break down the key scenarios and technical aspects you need to master. Follow along as we explore the practical differences between letting your phone decide and taking the creative lead.
Summary: A Strategic Guide to Mobile Photography: RAW vs. AI
- Why Does Your Sky Look Fake in High-Contrast Landscapes?
- How to Recover Shadow Details in Lightroom Mobile Without Noise?
- Night Mode or Manual Exposure: Which Captures Better Star Trails?
- The Editing Mistake That Makes Portraits Look Like Plastic
- How to Bypass Your Phone’s Auto-Processing With Third-Party Apps?
- How to Set Your Screen Profile for Print-Ready Photography?
- Why Does Rendering 4K Video Use All Processor Cores?
- Single-Core vs Multi-Core: Which Matters for Video Editing?
Why Does Your Sky Look Fake in High-Contrast Landscapes?
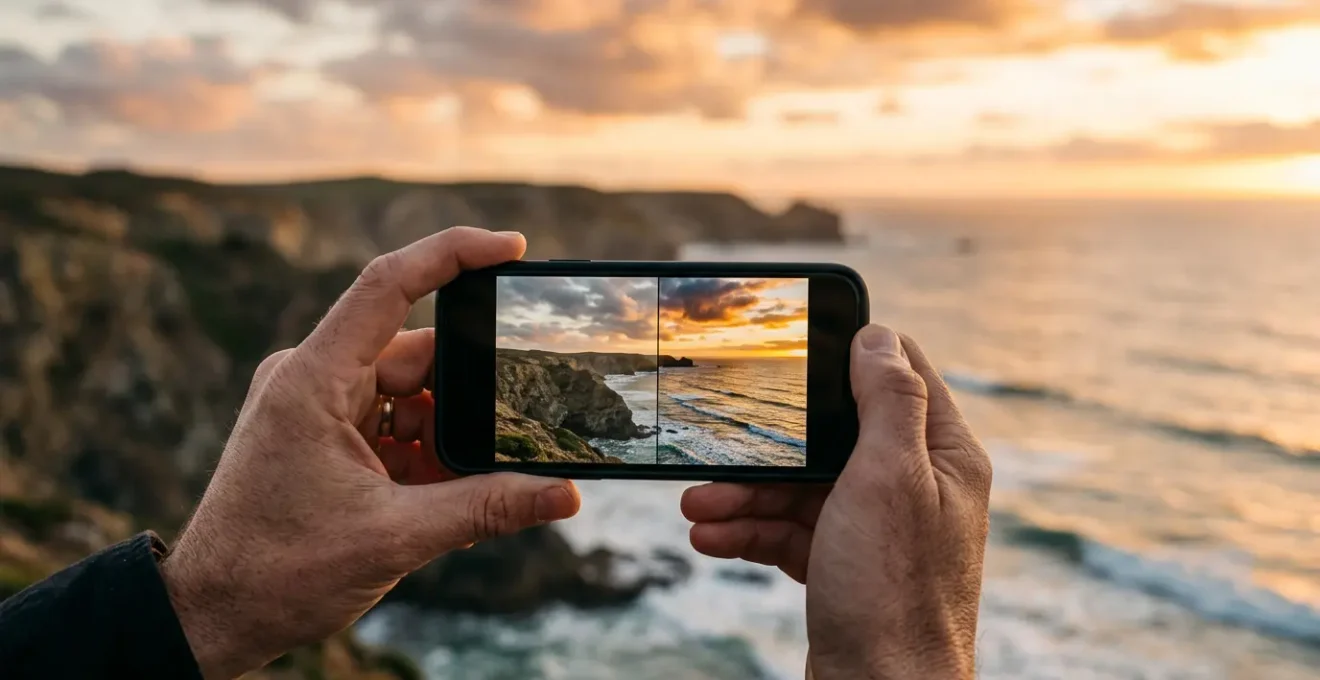
That artificial, overly vibrant blue sky that seems disconnected from the mountains in front of it is a classic sign of your phone’s AI working overtime. This phenomenon is caused by a process called semantic segmentation. In simple terms, your phone’s processor identifies and isolates different parts of the image—”this is sky,” “this is a mountain,” “this is a person.” It then applies separate, aggressive adjustments to each segment. The sky gets a saturation and contrast boost to look more “dramatic,” while the landscape might be brightened independently.
The problem arises at the border between these segments. The AI’s masking isn’t always perfect, creating an unnatural “halo” or glow around the edges of mountains or buildings. The reason it’s so aggressive is speed; the entire process is optimized to deliver a “wow” image in less than 0.5 seconds per image on mobile devices. The AI prioritizes a punchy, instantly shareable result over subtle, realistic blending. This is the core trade-off of automated processing: convenience at the cost of nuance.
As this image demonstrates, the effect can be jarring, making the photo feel like a composite rather than a single, cohesive scene. When you shoot in RAW, you bypass this entire pipeline. You receive the “digital negative” before the segmentation and aggressive local adjustments are applied. This gives you the power to make more subtle, blended adjustments yourself, ensuring the sky and landscape feel like they belong in the same world.
How to Recover Shadow Details in Lightroom Mobile Without Noise?
This is where shooting in RAW becomes a superpower, especially for a casual photographer. Imagine you’ve taken a photo of a friend under a covered patio on a sunny day. Your phone’s automatic mode (shooting in JPEG/HEIC) likely exposed for their face, leaving the bright background blown out, or exposed for the background, leaving your friend in a dark silhouette. When you try to brighten those shadows in a JPEG file, you quickly introduce ugly grain and color artifacts, known as digital noise.
This happens because a JPEG file has discarded most of the original sensor data to save space. A RAW file, on the other hand, is the full, unprocessed data from the sensor. It contains vastly more information, particularly in the shadow and highlight areas. Because of this, professional photographers note that RAW files offer up to 4 stops of exposure recovery, compared to roughly one stop for a JPEG. This means you have four times the latitude to rescue details from the shadows without them turning into a noisy mess.
The key to doing this cleanly in an app like Lightroom Mobile is to be selective. Instead of just cranking up the global “Shadows” slider, you should use masking tools to target only the areas that need lifting. This preserves the quality and detail in the rest of your image and gives you professional-level control right on your phone.
Your Action Plan: Perfect Shadow Recovery
- Import your RAW file into Lightroom Mobile and check the histogram to see how much of the data is in the dark regions.
- Create a selective mask (Brush or Radial Gradient are great) to paint over only the shadow areas you want to recover.
- Within that mask, gently lift the “Shadows” slider. Keep an eye on the image to avoid an unnatural, overly-HDR look.
- Still within the mask, apply a small amount of “Noise Reduction” and add a touch of “Texture” or “Clarity” to bring back detail.
- Finally, adjust the mask’s “Feather” to ensure the transition between the adjusted and unadjusted areas is seamless and invisible.
Night Mode or Manual Exposure: Which Captures Better Star Trails?
For capturing the magic of a starry night, the choice between an automated “Night Mode” and a manual approach is not about quality, but about creative intent. They are designed to achieve opposite goals. Your phone’s Night Mode is a marvel of computational photography, designed to create a bright, sharp, and *static* image of a dark scene. It does this by capturing multiple short exposures and then using AI to align them, averaging out noise and correcting for handshake. When it sees stars, its primary goal is to keep them as sharp, fixed points of light.
This is precisely the opposite of what you want for star trails. To capture the movement of the stars across the sky, you need a long exposure. An AI-driven Night Mode will actively fight against this, preventing the beautiful arcs you’re trying to create. This is a perfect scenario where you must bypass the AI and take full manual control. The best method is to use a third-party camera app that allows for manual settings and an intervalometer (a tool that takes photos automatically at a set interval).
Case Study: The Intervalometer Method for Star Trails
Rather than a single, hours-long exposure which would overheat the sensor and create massive noise, the professional technique involves “stacking” multiple shorter exposures. As detailed in astrophotography guides, you can capture stunning trails by taking a series of 20-30 second RAW exposures over a long period. For instance, astrophotographers recommend a minimum of 50 shots for short trails and up to 200-300 for truly epic ones. These individual RAW images are then combined in post-processing software to create the final star trail effect. This method gives you complete control and avoids the noise and limitations of a single long exposure, delivering results that Night Mode simply cannot produce because its fundamental purpose is to prevent trails, not create them.
So, the answer is clear: for a bright, quick shot of a night scene with friends, Night Mode is your best friend. For the creative and artistic pursuit of capturing star trails, manual exposure in RAW is the only way. It’s a classic case of choosing the right tool for the job.
The Editing Mistake That Makes Portraits Look Like Plastic
We’ve all seen it: a portrait photo that has been “beautified” to the point where the person’s skin has the texture and sheen of a mannequin. This is perhaps the most common and jarring artifact of over-aggressive AI processing and novice editing. The impulse is understandable—you want to minimize blemishes and create a flattering image—but the result often obliterates the very details that make a face look human.
This “plastic skin” effect happens when noise reduction and smoothing algorithms are applied too globally and too aggressively. Your phone’s AI, in its quest to produce a “clean” image, often misinterprets natural skin texture, pores, and fine lines as unwanted noise or imperfections. It then proceeds to smooth them into oblivion. When editing, a common mistake is to grab the “Noise Reduction” or a generic “Smoothing” slider and apply it to the entire face, or even the entire image.
The solution is to embrace texture and be highly selective in your edits. Professional retouchers never apply a global smoothing effect. Instead, they zoom in and use healing or clone tools to remove temporary blemishes (like a pimple), while carefully preserving permanent features like pores, freckles, and laugh lines. When you shoot in RAW, you start with all that natural texture intact. Your job as an editor is not to erase it, but to enhance the portrait while respecting its authenticity. Use subtle adjustments to light and color, and if you must smooth, use a selective mask to apply it very lightly, and only where absolutely necessary.
How to Bypass Your Phone’s Auto-Processing With Third-Party Apps?
When you’ve decided that you need the control that RAW provides, your phone’s native camera app may not be the best tool. While many now offer a RAW or “Pro” mode, they are often secondary to the main AI-driven experience. To truly unlock your phone’s camera sensor, you need a dedicated third-party camera app designed for manual control. Apps like Halide, ProCamera, or Firstlight are built from the ground up to give photographers direct access to the hardware.
These apps effectively create a new “computational pipeline”—one that you control. They bypass the aggressive sharpening, saturation, and semantic segmentation that your phone’s default app applies. Instead, they focus on capturing the purest possible DNG (Digital Negative) file, which is a universal type of RAW file. They provide the essential manual controls that allow you to make creative decisions *before* you press the shutter, not just in post-production.
According to the team at ProCamera, which positions itself as a comprehensive manual camera app, shooting in the default JPEG format is like being handed a finished print and then trying to change it. They use the analogy that editing a pre-processed JPEG is like “trying to smooth out a crumpled piece of paper.” A RAW file, in contrast, is the pristine, unfolded sheet, rich with data and potential.
When choosing a third-party app, you’re not just looking for RAW capture. You’re looking for a suite of professional tools that help you nail the shot in-camera. These key features are what separate a basic app from a true creative tool:
- Full Manual Controls: The ability to set ISO, shutter speed, and white balance independently to override the phone’s automatic choices.
- True RAW/DNG Capture: Confirmation that the app is saving uncompressed sensor data without interference.
- Focus Peaking: A live overlay that highlights the sharpest parts of your image in a color (like green or red), which is essential for confirming perfect manual focus.
- Zebra Stripes: A warning overlay that shows “marching ants” over areas of your image that are overexposed (highlights are “clipped”), so you can adjust before you even take the picture.
- Live Histogram: A graph showing the tonal distribution of your image in real-time, helping you avoid losing detail in the brightest highlights or darkest shadows.
How to Set Your Screen Profile for Print-Ready Photography?
One of the most overlooked aspects of mobile photo editing is the screen itself. You could be making perfect adjustments to a RAW file, but if what you see on your screen doesn’t match reality, your final edits will be flawed. Most smartphone displays are set to a “Vivid” or “Adaptive” mode by default. These modes boost saturation and contrast to make content look more punchy and appealing for general use, but this is a disaster for accurate photo editing.
Editing a photo on a “Vivid” screen is like painting in a room with colored lights on. When you take your painting into normal light, all the colors will look wrong. Similarly, if you edit on a Vivid screen, you’ll likely desaturate the image to make it look “normal,” resulting in a flat, dull photo when viewed on any other calibrated device or in print. To ensure your edits are accurate, you need to create a consistent and neutral viewing environment. This involves both software settings and physical environment awareness.
Before you start any serious editing session on your phone, especially with RAW files destined for print or for a professional portfolio, run through this simple calibration workflow. It takes 30 seconds but can save you from hours of frustration and disappointing results. It’s the foundation upon which all good editing is built.
- Switch to Natural Mode: Go to your phone’s display settings and change the color profile from ‘Vivid’ to ‘Natural’ or ‘sRGB’. This provides a more accurate, less saturated baseline.
- Disable Auto-Adjustments: Turn off features like Apple’s True Tone or Samsung’s Adaptive Color. These features alter the screen’s white balance based on ambient light, which will trick your eyes while editing.
- Set Consistent Brightness: Disable auto-brightness and set your screen to a comfortable, medium level (around 50-60%). A screen that’s too bright or too dim will lead to incorrect exposure adjustments.
- Control Your Environment: Avoid editing in direct sunlight or under strong colored lights (like a neon sign). A neutral, diffusely lit room is ideal for accurate color perception.
- Export for Quality: When your RAW edit is complete, don’t just export it as a standard JPEG. For maximum quality, especially for printing, export it as a 16-bit TIFF file in a wide-gamut color space like Adobe RGB.
Key Takeaways
- The choice between RAW and AI is not about which is “better,” but which is the right tool for the specific photo you are taking.
- Let your phone’s AI handle simple, well-lit scenes for speed and convenience, but be aware of its tendency to create “fake” skies and “plastic” skin.
- Switch to RAW and use third-party apps when you face challenging lighting (deep shadows, high contrast) or have a specific creative goal (star trails, nuanced portraits) that the AI would fight against.
Why Does Rendering 4K Video Use All Processor Cores?
Moving from still photos to the world of video editing on your phone, you may have noticed your device gets warm and the battery drains quickly during certain tasks, like exporting a 4K video. This is because these tasks are fundamentally different from the simple, single-touch adjustments you make when editing a photo. Tasks like rendering video, or even some advanced computational photography tasks, are highly “parallelizable.” This means the workload can be broken down into many small, independent pieces and distributed across all the available processor cores simultaneously.
Think of it like checking out at a supermarket. A simple task, like adjusting the exposure on a photo, is like having one item; it’s fastest to go through a single, fast checkout lane (a single-core task). But rendering a 4K video is like having a hundred different items. It’s far more efficient to open up eight separate checkout lanes (multi-core processing) and have eight cashiers work on different parts of your order all at once. This gets the total job done much faster, even if each individual cashier isn’t the absolute fastest in the store.
Tasks like creating an HDR photo or a Night Mode shot involve merging multiple frames and running complex algorithms, which is a ‘parallel task’ that maxes out all processor cores for a short burst.
– Technical analysis comparison, Mobile Photography Processing Architecture
This principle explains why modern mobile chips are not just about raw clock speed, but about having a mix of high-performance and high-efficiency cores. Your phone’s operating system is constantly making decisions about which type of task it’s facing and how to best allocate its resources—whether to use one fast core or all of them at once. Understanding this helps demystify why your phone’s performance can feel so variable depending on what you’re doing.
Single-Core vs Multi-Core: Which Matters for Video Editing?
So, when you’re looking at phone specs and you see terms like “single-core speed” and “multi-core performance,” which one actually matters for your photo and video editing workflow? The answer, frustratingly and accurately, is “both.” Different parts of your editing process stress the processor in different ways. A smooth, responsive user experience depends on a smart balance between these two types of performance.
Single-core speed is king for tasks that are inherently sequential and require immediate feedback. When you drag an exposure slider in Lightroom, you expect to see the change on your photo instantly. This is a single-core task. The faster that one core can compute and render the preview, the more “snappy” and responsive the app feels. A low single-core speed leads to that annoying lag between your action and the result on screen.
Multi-core performance, on the other hand, is all about throughput for complex, heavy tasks that can be broken down. This is where AI computational photography and video rendering live. Taking a Night Mode or Portrait Mode shot, batch exporting 50 edited RAW files, or rendering your final 4K holiday video all benefit from having multiple cores working in parallel. The more cores you have, the less time you’ll spend staring at a progress bar.
This table breaks down how different common editing tasks rely on different aspects of your phone’s processor, as highlighted by comparative analyses of flagship device features.
| Processing Task | Primary Performance Factor | Impact on User Experience | Relevant Hardware |
|---|---|---|---|
| Real-time slider adjustments (exposure, white balance) | Single-core speed | Determines UI responsiveness and immediate preview rendering | High clock speed CPU (e.g., Snapdragon efficiency cores) |
| AI computational photography (HDR+, Night Mode, semantic segmentation) | Multi-core parallel processing | Affects capture time and processing delay after shutter press | Neural processing units, multi-core CPU |
| Batch exporting multiple edited RAW files | Multi-core throughput | Total export time scales with core count and efficiency | High-performance multi-core CPU clusters |
| Gallery preview generation and thumbnail rendering | Multi-core processing | Determines how quickly image libraries load and scroll smoothly | GPU acceleration + multi-core CPU |
Ultimately, a powerful mobile editing device isn’t just about having the highest benchmark score in one category. It’s about a well-architected system that can provide high-speed single-core performance for a fluid UI and massive multi-core throughput for the heavy lifting, giving you the best of both worlds.
Now that you understand the “why” and “when” of RAW vs. AI, the next step is to put it into practice. Stop treating it as an all-or-nothing choice. On your next holiday, challenge yourself to be a hybrid photographer. Use your phone’s default AI for the easy, everyday snaps. But when you see a challenging, high-contrast landscape or a once-in-a-lifetime portrait opportunity, take the extra five seconds to switch to a manual app and capture a RAW file. You’ll return not just with photos, but with possibilities.